U.S. Style Cabinet, Where You Go When You Want it Done Right
Good Materials and Good Hardware Are Expensive and a Big Part of the Cost of Cabinets
We build MDF and Marine Plywood cabinets with little natural wood to help minimize termite damage. Termites don’t like the glue in the engineered products. However, if you are going to invest in quality woodwork in your home you should treat for termites and have the home in good condition and keep the home dry inside.
The available kitchen cabinets in the Pampanga area are not suitable for export and frankly quite expensive for the level of quality. The average Pampangan has the choice of expensive but poor quality imported Chinese cabinets assembled and modified by a local re seller or locally produced cabinets made with hand held circular saws by hardworking and enthusiastic workers without proper equipment or supervision. You wouldn’t be here if you didn’t already know this and wanted a secure and safe company to do business with.
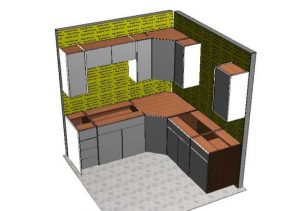
A cabinet job starts off with carefully measuring the walls in the room the cabinets are to be installed in. The details are entered into a powerful kitchen cabinet software package that generates a scale drawing of the room and the cabinets are drawn and the drawings are shown to the customer to ensure all the details are exactly as the customer requires. Then the same software generates detailed cut lists and a bill of materials. The job then goes onto the shop floor for production.
Proper equipment allows the quality to be built into the cabinets with each step. This starts with panel saws capable of cutting straight and square parts in accurate sizes. Using a straight edge and a hand held circular is difficult even with a skilled worker, the cuts will not be square, the parts produced will be of varying width, even the squareness of the edge will suffer. A proper panel saw has a five horsepower motor rigidly held in place in a frame running on precision ground linear shafts with linear bearings. The motor is powerful enough that it spins at full speed which keeps the blade straight and square while a powerful dust collector pulls the sawdust out of the way.
Next the panels have the finished edges edgebanded and the system holes are drilled into the end panels. System holes provide locating holes for all the hardware, hinges, drawer slides, and shelf pins. These holes are crucial for the European system of cabinet making so the holes are drilled using precision drilling fixtures containing hardened steel drill bushings.
Nearly all of the shelves are adjustable, the drawers boxes can have metal sides for durability, with 3/4″ thick painted MDF drawer bottoms and adjustable drawer fronts. Or you can choose the undermount or side mount slides on plywood drawer boxes. The hinges are all concealed European style hinges with adjustment screws to move the doors up, down, in and out, and side to side. Drawer fronts can be adjusted a small amount up and down and side to side. These drawers are strong and very durable. Far stronger than a wooden drawer that will warp or get eaten up by termites.
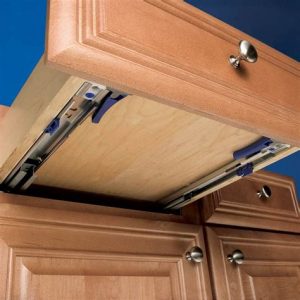
A corner cabinet measures about 31″ x 36″ x 36″ so be sure you have a large enough front door to get the cabinet through. A 36″ wide front door is needed, the cabinet can be turned on its side to get the 31″ side through the front door. You can add lazy susan turntables, usually two shelves, the one in the picture only has one shelf. The upper cabinets are hung on steel rails or brackets that attach to the wall and there are suspension brackets inside the upper cabinet to adjust the height and level of the cabinets.
The toe kicks at the bottom of the cabinet can be removed in most cases for running wires, water lines, or just spraying for bugs. The stove ends are left uncovered to provide some ventilation to help prevent mold build up. You do need a dry location to install good cabinets and the sink drain needs to be working properly. It is a good idea to fix any leaks in the drains or roof prior to installing expensive cabinets. The engineered marine plywood and MDF will handle normal humidity just fine.
With the parts cut to size, edgebanded, and drilled, the cabinets carcasses or boxes are assembled. At that point the doors and drawer fronts are laid in place on the cabinet boxes which are laid on their back to ensure a good fit on the exterior parts. Then the drawer fronts, doors, end panels, fillers, and trim are carefully sanded and sent into the finishing department.
Finishing is done with an air assisted airless sprayer, imported from the United States. The sprayer lays down a fine coating of paint with all exterior parts being sprayed flat so that the maximum thickness coating of paint can be applied. All end panels are pre finished before installation for that very reason so the paint is nice and thick.
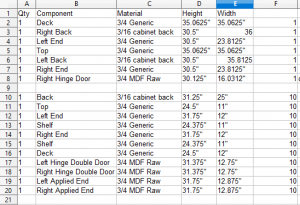
Cut list example
Once the first coat of paint is dry the painted parts are sanded by hand. The paint is a lacquer based product but the grain on the wood will raise but the paint locks the fibers in place as it dries so the sanding leaves a smooth finish. A second coat is sprayed and sanded as well to ensure there are no thin areas or sharp edges left uncovered. Then a sealer coat of clear lacquer is applied before being sanded once again before the final coat of lacquer is applied.
Next the backs are installed in the cabinets, the backs being left out to allow the spray booth to pull the overspray out and leave a smooth finish. Drawer slides and hinge base plates are installed and the drawer boxes, drawer fronts, and doors are installed. The cabinets are set up on their feet ready for an inspection from the customer. Upper cabinets are set in place on top of the bottom cabinets so the customer sees the entire set and can judge the finish quality and ensure the cabinets came out exactly as the drawings said they would.
The installation will take about two to three days. If you are having us make you a solid surface countertop we will make a wooden countertop template once the cabinets are installed and it will take two to three working days to build the countertop and get it installed. You pay a deposit on the countertop, 50% of the cost, usually around the time that the cabinets go into the finishing room so we have time to get the countertop sheets delivered from Manila. The second half of the countertop is paid immediately after we install the countertop.
You can purchase your own sink or we can pick one out for you. Be sure it is a drop in sink, not an undermount as undermount sinks cost extra to install. Some sinks come with an inexpensive faucet or you can buy just the sink and purchase a quality faucet that is likely to last longer.
What About Material?
Sheet goods are used to build the cabinet boxes, usually MDF, Medium Density Fiberboard, melamine covered MDF sheets, or marine plywood. Each has its pluses and minuses.
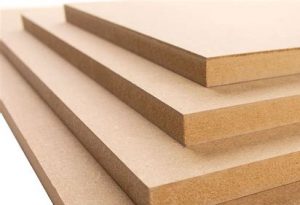
MDF is a very stiff and dense 4′ x 8′ sheet material. It starts out as a 6″ thick mat of wood fibers, pressed down to 3/4″ thick and baked. It makes a wonderful cabinet material, stiff, strong, flat, stable, and termites don’t like to eat it. Unlike marine plywood there are no voids in the material so when you put a screw or nail into the material there is something to hold it solidly. If MDF gets wet it will swell up a bit but when it dries out it shrinks down nearly to the original thickness. That isn’t an issue; anyone that can afford good cabinets is going to make sure the sink doesn’t leak so water should never hit a cabinet unless it is a temporary spill which won’t hurt a finished cabinet. MDF is our choice of material for making cabinets that are to be painted. The only down side is that it is heavy, much heavier than marine plywood.
Melamine is MDF covered with thin layers of decorative plastic film, a very hard film that is very durable. It holds up to water spills well, not so good with solvent spills like lacquer thinner which will damage the wood grain look, won’t hurt the film as much as it makes it look different. It makes a great cabinet box, even doors and drawer fronts. I wouldn’t use it for a toe kick because you are going to be mopping the floor and the toe kick would be damaged. You can use marine plywood for that toe kick and laminate or use an aluminum or pvc toe kick board. The only down side to melamine sheets is that one side will chip out slightly as you cut it. Nearly all materials cut smooth on once side and chips on the other as the saw blade exits the material while cutting. You can put those chips on the inside surface of the cabinet part or door and minimize the flaws. There are many different patterns and colors of melamine board available if we pay to have them delivered from Manila.
Please visit our showroom to see samples of melamine, MDF, and marine plywood. For some people the chipping we are talking about are a non issue, for the OCD types they might not like the chips on the back side of the parts.

Melamine board MDF boards
Marine Plywood is a better grade plywood with an exterior glue. It isn’t very smooth even after painted but plywood has a reputation in the cabinet world at least from the customer’s viewpoint. As a cabinetmaker, not so much. It is better around standing water but who would build a nice set of cabinets and then allow them to sit in standing water? Eventually even the water will get to the marine plywood. Marine plywood also isn’t as flat and as stable as MDF but you can use it for things like cabinet boxes, toe kicks, end panels if they are laminated. You can even buy melamine coated plywood. The big downsides to marine plywood is the roughness of the grain, the warping, not being flat, and the voids. You will not know the voids are there until you try to hang a drawer slide or cabinet hinge only to find out some of the inner core is missing so there is nothing to hold the wood screws! On a cabinet side or shelf, no problem, move the screw over a bit. On a door, big problem. The hinge goes where it is supposed to go, no moving it.
There are some beautify wood grain plywood sheets available but they are quite expensive. If you do a slab door you can make a stainable wood cabinet. Solid wood for making doors and drawer fronts is a lot harder to find in the proper thickness. There is plenty of 1.5″ and 2″ thick solid wood lumber available but few places can re saw it down to the required 1″ thickness and plane the lumber down to 13/16″ thickness needed to make solid wood door parts and drawer fronts. Then there is the termites or anay. If a house is kept treated for termites this is an option if the budget is large.
Cabinet part thickness is usually 3/4″ for the main cabinet box, end panels, drawer fronts, and doors. The hinges and drawer slides are designed around this thickness, you can go to 5/8″ or even 1/2″ to save a bit of money but the savings are less than a thousand pesos for a set.
Cabinet backs are usually 3/16″ or 1/4″ marine plywood, either painted or covered in laminate. You can get matching melamine 1/4″ sheets for melamine cabinets.
All of the materials get a PVC edgebanding that matches the laminate, is a paintable wood, or a solid color that complements the exterior. When the doors and drawers are closed only a tiny gap is left to allow the edgebanding to be seen.
What About Hardware?
Drawer slides are available in four main types here in the Philippines.
Metal side drawer boxes have metal sides, only the back and bottom are made out of MDF or plywood. They are getting harder to find thanks to the pandemic and the fact that the other slides are more profitable for the hardware companies to import. The advantages are that it makes a really strong box, with steel ledges below the drawer bottom and behind the drawer back. You also save the cost of the material for the drawer box sides and the drawer box front and they are fast to assemble. They have a small amount of adjustment built into the slide in some brands. When the drawer is open all the way around 3″ of the drawer remains inside the cabinet box but the contents are easily reached. The drawer bottom is usually 3/4″ thick and very strong.
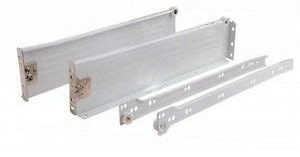
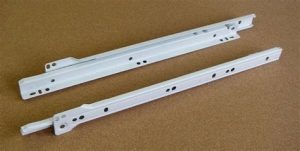
Side mount full extension drawer slides as the name says are side mounted on a plywood box and the drawer pulls completely out of the cabinet for more accessibility. They cost around the same as the metal side drawer boxes but you also have to purchase the drawer box sides and drawer box front materials. The drawer bottom has to fit into a 1/4″ x 1/4″ groove in the drawer box so the bottom is usually 1/4″ or 3/16″ thick plywood which is strong enough in most cases. A 1/2″ thick plywood brace can be inserted under the drawer box bottom when needed. A plywood box that is screwed together on good side mount full extension slides is durable enough to last a long time. These slides will add around 600 pesos to the price of a drawer compared to a metal drawer side system.
Undermount slides are full extension, usually soft close, and are mounted on the underside of the drawer. The drawer box is made out of plywood, either stained, painted, or covered in laminate on the exposed surfaces. They are quite expensive, easily adding 1500 pesos to the cost of a drawer by the time you buy the slide and make the drawer box. There is usually some side adjustment, some vertical adjustment, and as the drawer front is mounted on the front of a full drawer box the drawer front can be moved around easily to adjust the gaps between drawers or doors on the cabinet.
The fourth general type of drawer system is the double wall. Usually soft close and full extension, using the same undermount slides as the undermount slide system but with additional metal or plastic covered metal drawer sides. These will be quite expensive, starting around 3000 pesos per drawer box over a metal side drawer box system. It marries the strength of the metal side drawer box with the full extension and soft close feature of the undermount drawer systems. The bottoms are usually 5/8″ thick as well as the back of the drawer box. The drawer front is attached with de-mountable clips so the drawer front can sometimes be snapped on and off for cleaning out the drawer. There is usually some side adjustment and some vertical adjustment to line up the drawer fronts.

Metal side drawer slides Undermount drawer slides

Undermount Drawer Slides installed
Side mount full extension slides
There is a fifth type of drawer slide, the simple euro slide. It has the same cabinet member as the metal side drawer system but the drawer member portion is about the same size so a full plywood box is required. There is no adjustment on the slides, they are a 3/4 extension, non soft close, and the savings from using the cheaper drawer slide over the metal side drawer system is more than eaten up by having to make a full plywood drawer box. These are functional drawer slides but more expensive than the metal side drawer box slides after paying the additional expense for a full drawer box so they are rarely used. Instead, upgrade to the side mount full extension for just a bit more.


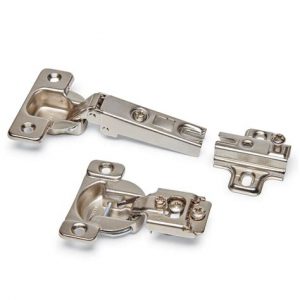
Door hinges
Hinges are usually available in standard or soft close. There is usually a cheaper “tec” version of the standard euro hinge with less adjustment and fewer screws attaching it to the cabinet. All use a standard 35mm hinge cup hole drilled into the door with either two holes for inserting wood screws or a special pre mounted screw that requires a matching three drill bit head in the door drilling machine.
The base plates attach to the cabinet box and there are two versions. First is the wing plate or euro style that has two pre attached 5mm screws that are inserted into the system holes that are drilled into the sides of all cabinet boxes. The second type is called a face frame adapter style base plate. It has a couple of hooks on the front edge that catch the front edge of the cabinet box, then you manually insert two wood screws into the two holes, which are usually slotted to allow a bit of vertical adjustment. The wing base plate style is much stronger as the 5mm screws going into the pre drilled system holes is both faster and much larger diameter than the wood screw. In certain locations you have to use these face frame adapter hinges, such on a corner cabinet if the special corner cabinet hinges are not available.
The hinge portion either snaps onto the base plate which allows tool free removal of the door or they slide on using a screw to hold them in place. The slide on hinges are a bit cheaper but also slower to install so we use the clip on hinges to keep the labor costs down.
Then you have corner cabinet hinges in three types; blind, dubbed, and L shape corner cabinet door hinges. The dubbed style corner cabinet either has a special hinge that has a 45 degree base plate or you add a small trim strip on both sides of the opening and use a standard door hinge.
Blind corner cabinets are only 24″ deep, they do not extend into the next wall so it creates a 24″ to 27″ dead corner that requires a 3″ filler on the other side to keep the drawers and drawer knobs from stopping other drawers from opening. They require a special hinge called a blind corner cabinet hinge. The one in the picture to the right if you are on a laptop computer or desk top is a wing base plate snap on type.


Then you have L shaped corner cabinet hinges that require two sets of hinges; one for the bi fold door that creates the L shape, the other for hanging the door from the actual cabinet box. We prefer not to use the L shaped corner cabinet as the doors are huge, 24″ wide with two sets of hinges, that makes the door both expensive and prone to failure with all the stress on the hinges. A much simpler approach is the dubbed corner cabinet, one door, one set of hinges, much stronger and less expensive.


Cabinet Feet and Suspension Brackets
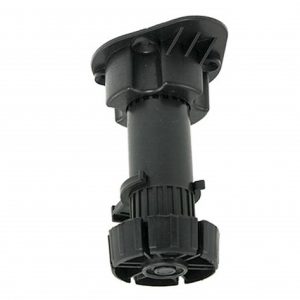
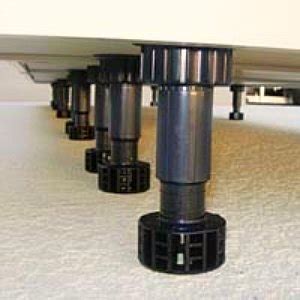
Cabinet feet hold the cabinet up off the floor to protect the cabinets and to provide a toe kick, a small space that your toes can extend up into while using the cabinet so you are a bit closer to the work surface.
We like these ABS plastic leveling feet. They can only hold around 300 pounds each but that is 1200 pounds per cabinet, plus the cabinet is fastened to the wall to provide additional support. The leg in the picture to the right shows the upper part which is installed on the cabinet deck as part of the assembly process which protects the bottom of the cabinet as it is assembled and finished and during delivery. At the job site the long leg is inserted and the bottom part screws in and out to level the cabinet. You can see a small clip around the leg, that clip attaches to the toe kick and allows the toe kick to snap on and off if needed.
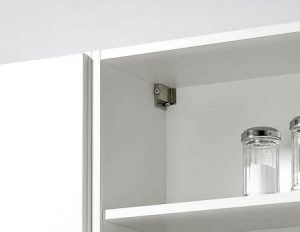
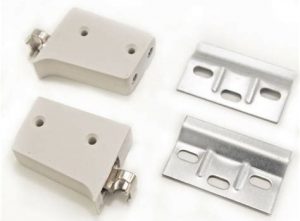
The suspension brackets hold the cabinets on the wall and provide some vertical and horizontal adjustment. The small ABS plastic block fastens inside the cabinet with a hooked arm that projects out the back of the cabinet that hooks onto a small metal plate that is screwed to the wall. There are two screws on the front, one for vertical height adjustment, the other that pulls the cabinet in and out from the wall for leveling purposes.
Hollow block walls in the Philippines can be a challenge to hang cabinets on if the builder is careless and doesn’t provide a flat and level wall. Cabinets are straight and square and must be installed level so that means adding blocking on the wall at times to level out the wall hangers so the hooks on the suspension brackets can reach the wall hanger. We can usually come up with a solution to a crooked or out of level wall but any needed trim is the responsibility of the builder that left a crooked wall!
Another challenge is pilasters, thickened portions of the wall designed to add strength and stiffness to a wall. If these are on the inside surface of a wall where cabinets are to be hung we must either notch out the entire cabinet to allow the cabinets to be hung or just leave that portion of the cabinet blank or add a wide filler panel to cover the wasted space. These pilasters can usually be added on the outside of a wall where they are out of the way of the interior cabinets and furnishings.